
I’ve been asked a number of questions relating to this topic, since the time I started doing Facebook Lives, and thought it was time for a post about some of these queries, to help others who are wanting to up their game when it comes to doing Lives for their DIY business. Really, most of these tips can relate to ANY type of business or personal page that you want to promote well.
This post contains affiliate links – thank you for supporting my blog.
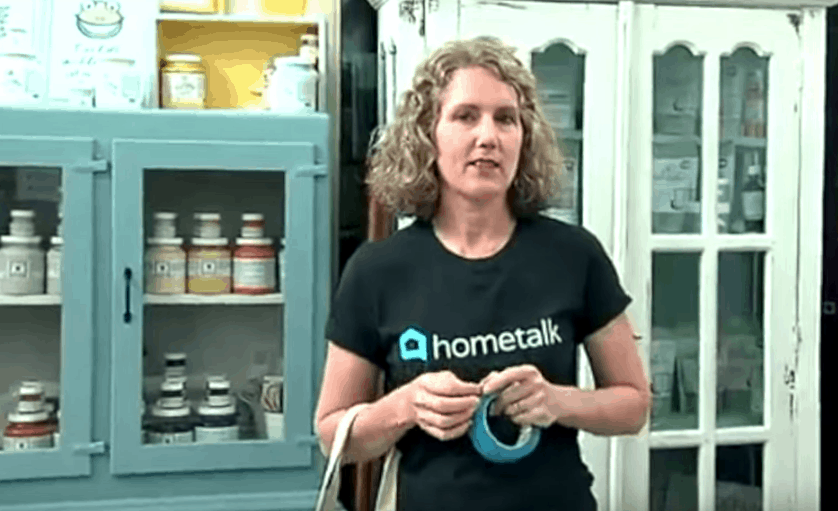
First, let me say that I am not the expert, but I AM married to one. Haha. So, he’s the real magic maker when it comes to my more professional Facebook live videos that you may have seen over the years via Essential Stencil’s Facebook page, Hometalk’s Facebook page, How to Paint Like a Pro, or my own ‘I Restore Stuff‘ Facebook page.
A little background
Marty, my awesome husband, has been in the audio/video industry for the entire time I’ve known him – we’re coming up to our 26th Wedding anniversary towards the end of this year, so it’s been at least a couple more years than that! He loves to test and try out new equipment & the latest technology, and stay on the cutting edge in his industry. He’s worked in the recording/audio industry since he was 19 and has added video production to his skill set over the years, providing both audio and video production for large scale corporate events, music festivals, conferences, you name it – both here in Australia, and in his birthplace, the good old USA!
So when Facebook introduced live video as a part of its social networking mega influence, we knew that video was here to stay and that it continues to be a major part of society and influence, educating and entertaining the masses! A couple of years ago, I started doing Facebook lives for the large DIY network, Hometalk and for my own page, and when Marty heard that Hometalk had a rather large social media following, he offered to provide a little more than the standard ‘iphone holding camera person’ for me. Oh, man – he pulled in the big gear. “Really, babe?” I said, “I’m sure we don’t need to go this far”. But he did have some ulterior motives, and thought it would be great to test out the new live streaming methods he planned on using for his larger corporate jobs, on me – his guinea pig.
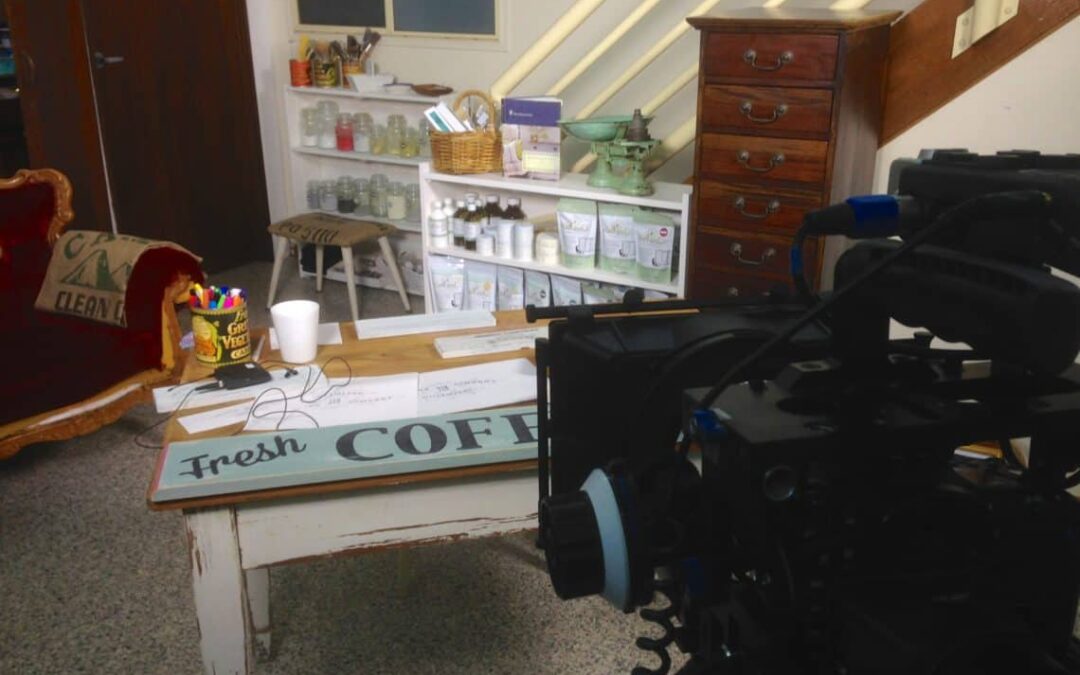
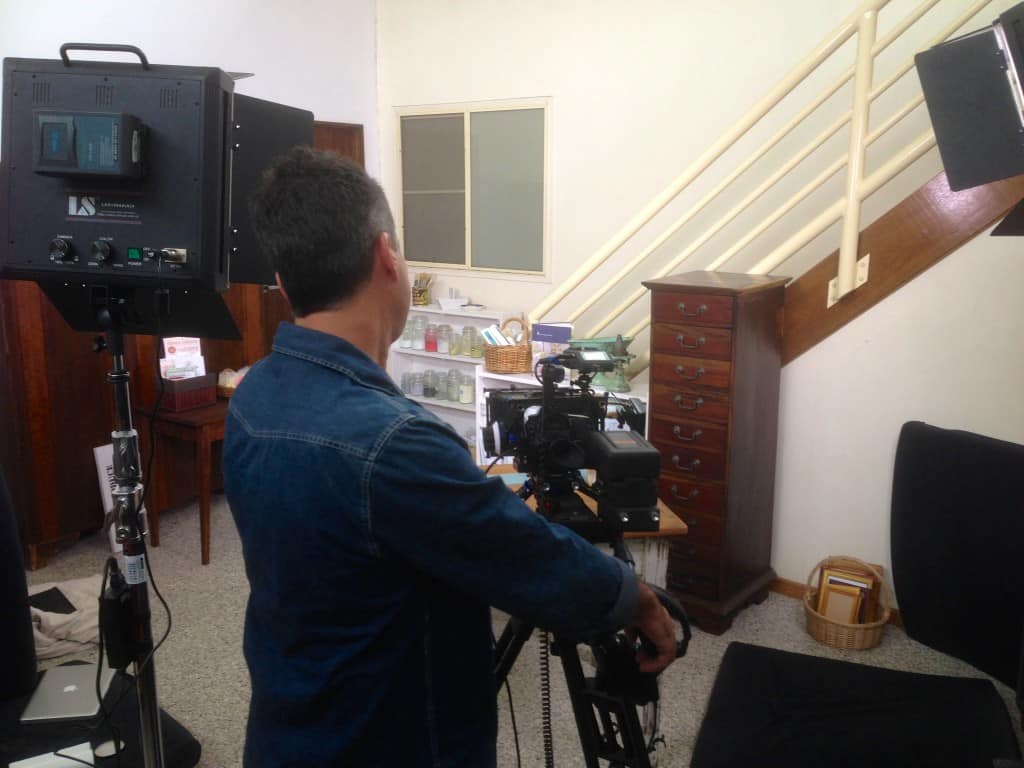
And so, we did indeed have a multi-camera shoot, with extra laptop for my friend who read the comments & questions, another friend switching the cameras live in our home based recording studio, and an extra camera person (usually my son, who was studying and home at the time) as well as Marty. Not to mention we each had lavalier microphones taped to our aprons/shirts – oh yeah, we went the full hog! Major production scenario – but it did look great – and Hometalk admin were impressed and wanted more!
Needless to say, this couldn’t happen every time I wanted to do a live, as I had to work around Marty’s schedule, friend’s availability, etc. and so, most times, I do have to resort to using ‘just me’ for my own page, holding the camera or putting it on a tripod, etc.
“But I don’t have a production guy!” you say.
Having said all of that, you do NOT have to have your own production guy to make your Facebook Lives look pretty decent. There ARE a few tips that you can apply to your own Lives so that you can improve the quality and standard of Live videos presented on your professional pages.
So here are my top beginner tips to get you started. I do go into more detail on Facebook Lives in my one-on-one mentor session if you’d like to book a coaching time with me.
5 Top Tips for Facebook Lives on Your DIY Business Page
1. Good Content
With so much video content vying for our attention these days, it is essential that we give our audience quality content to consume. Otherwise, they’ll just keep scrolling. Make sure you are bringing your people VALUE. Make it engaging and entertaining, giving them a reason to hang around and watch. Think about the Facebook lives that you stop and watch and why you watch them – are they inspiring you to act on something the video is teaching or telling you about?
If you haven’t already, you can download my FREE Printable PDF: “10 Video Content Ideas You Can Try Today” to get you started with good content ideas:
2. Good Audio
Especially if your live video involves you or anyone else trying to explain something, or you’re having a heart-to-heart with your live audience – if you can’t be heard, people are less likely to stick around.
Check your surroundings – are you outdoors in a busy street? Are the kids yelling and having a crazy fun time in the room next door? It makes sense to opt for a quieter environment to film your live in. However, if it isn’t possible to change your location, one way to enable you to control the ambient noises around you is to use a microphone with a more directional pick-up pattern, ie. the mic focuses in the direction of your voice rather than picking up all the sounds around you.
This could be:
- a) a lavalier microphone – you may also know these as a “lapel mic” or a “clip on mic” – the kind you can attach to your clothing (your shirt) pointed to your voice, or
- b) a shotgun microphone (has a very narrow pick-up pattern) or
- c) a hand-held microphone
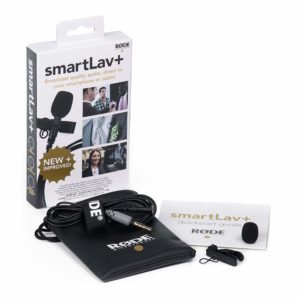
Any of the above options, are able to be connected to your smartphone via an adaptor cable. Here’s an example of the lapel mic that I use for my Facebook lives, which I’ve found to be excellent quality and super convenient to throw in my handbag to take with me anywhere I go (even comes with a little carry purse).
Rode smartLav+ Lavalier Microphone for iPhone and Smartphones (Aussie customers can find them HERE.)
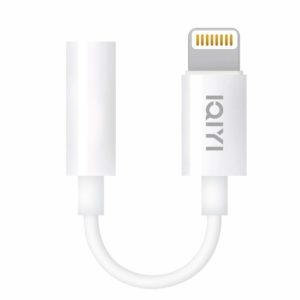
If you have the iphone 7 or above with a lightning port instead of a standard headphone/mic jack, you will need to get an adaptor like this. A regular adapter will not work as they are only for headphone input. (Australian’s can find them HERE.)
Also, if you find that the cable on the Rode smartLav is not long enough, you can use an extension cable like this: (Australian readers can find them HERE.)

3. Good Lighting
Having yourself or the set you are working on, lit well, will bring the quality of your video up to a higher standard, making your live video stand out above the rest. Before we get into any gear you may want or need, let’s talk about some important guidelines.
Basically, when videoing, your foreground (where you are, your face or where your hands are demonstrating a project), needs to be the highlight.
It is important when videoing – whether live or not – that your subject (you or the project you are working on) is not over-exposed or under-exposed. Over exposure is when your light source is so bright that it blows out the features of the face or the subject, and there is no good way to fix this in your post editing. Under exposure is when the area you’re filming in is too dark, and whether you try to fix this with your phone or camera settings or attempt to fix it during editing, it will result in graininess and pixelation – a loss of quality.
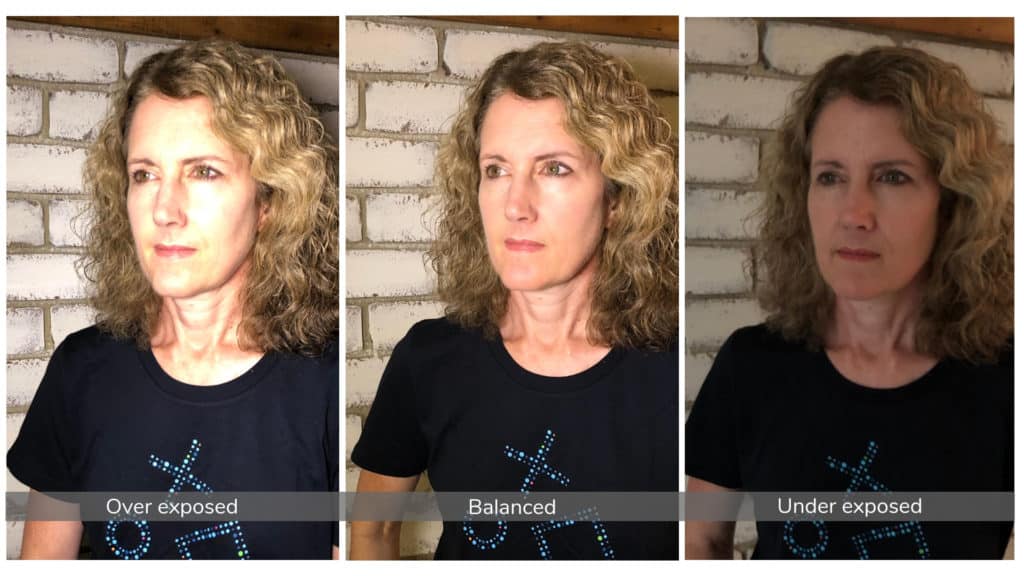
Always try to adjust the lighting in your environment, before attempting to adjust any settings on your camera or phone.
Now that we have those things established, here are a few options for lighting that my handy hubby, Marty, has put together for us:
- No Lighting Kit – Even if you do not have a fancy lighting kit, there are some great tips to help you make the most of what you do have. The first tip Marty has for us here, as mentioned above, is to adjust the lighting in your environment, before attempting to adjust any settings on your camera or phone. So if the room you are doing your Facebook Lives in is fairly dim and dark, move to an area that has more natural light streaming in, like near a window. Avoid shooting into the window – you want the light coming in from behind the camera and washing onto your face or onto the project that you are working on.
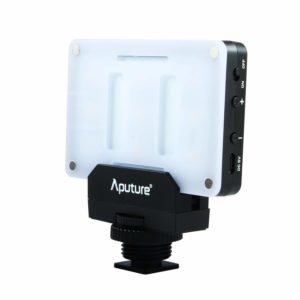
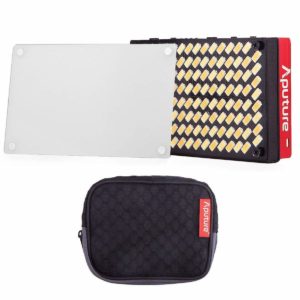
- Lighting Option 1 – Aputure Amaran AL-M9 – this LED light produces “daylight” which is a cool/blue light, great for lighting up a subject at a close range in daylight.

- Lighting Option 2 – Aputure AL-MX – this LED is a variable bi-colour, which means you can vary the colour temperature from a cool light (eg. outdoor light) to a warm light (eg. indoor warm lighting – orange/yellow tone). It’s extremely helpful to be able to match your light with the environment that you’re in, in order to achieve natural looking skin tones. (Australian readers will find similar version HERE.)
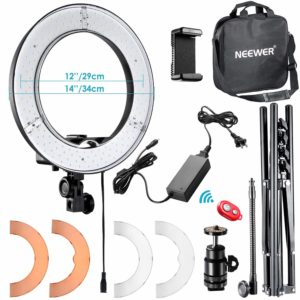
- The Diva Ring Light – the main purpose for the Ring Light is to be an additional fill light to smooth out the features of the face with soft light. Often it is mistakenly used as the ONLY light in a video set up. While this can have mixed results, and may look great sometimes, users need to be aware that it will create a reflection of circular rings of light in each eye, which can be a distraction to some viewers. (Australian readers will find similar version HERE.)
4. Good Planning for Facebook lives
Having a plan is always a good idea, instead of winging it. You don’t want to be live and having to think of what it was that you were going to say, or getting half way through a tutorial, and realising that you have forgotten some key components of your project.
At the very least, jot down some notes on a piece of paper in front of you, so that you can refer to them if you get stuck or forget where you were up to. It will also help you to remember really important things going on in your business, that you may want to make your audience aware of.
A good plan can be as detailed or as simple as you like – it all depends on you, your audience and what they want, and the content of the live itself.
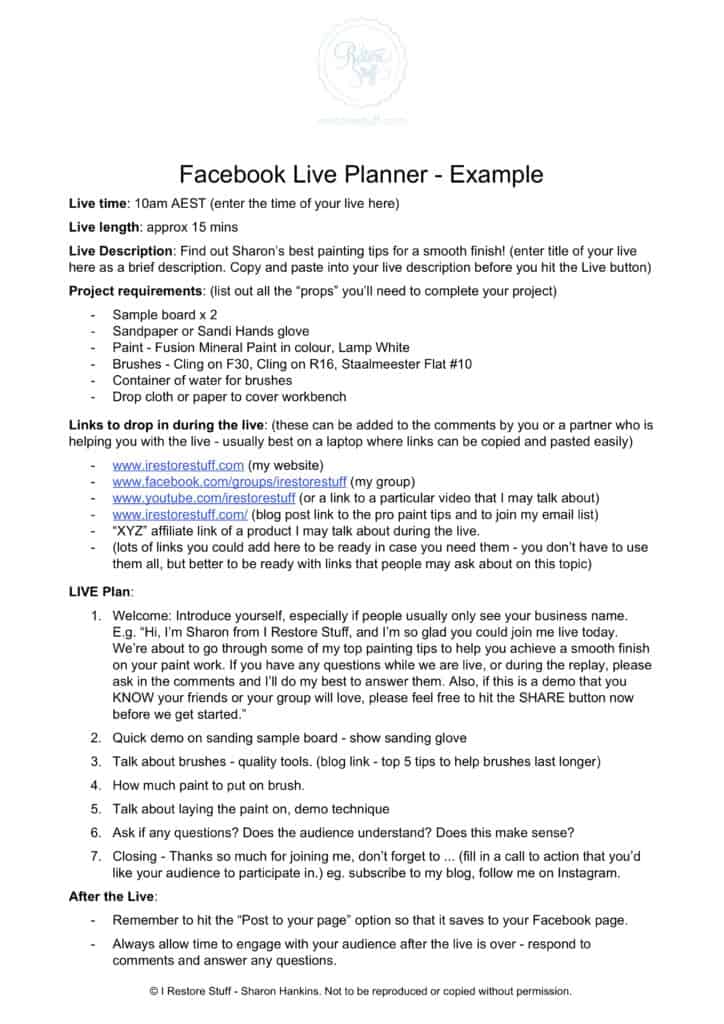
Here’s an example of what a plan for your live could look like:
5. Maximising Facebook Live Content
Once you’ve published your live on your Facebook page, you now have some great content to share and also re-purpose. It’s time to make the most of your video. Here are some ideas for sharing and making the most of the video you have just produced for your “Live”.
- Share your Facebook lives to any other relevant groups that you are a member of on Facebook (be sure to check the individual group rules first to make sure sharing from your business page is appropriate).
- Share it to your personal FB page if appropriate – sometimes family and friends have similar interests, or know others who do too.
- Consider boosting your live or promoting it with advertising dollars – this way you can target your audience and show up in more news feeds.
- Download the Live video and re-purpose it by uploading to your Youtube channel. Here you reach a whole other audience with the same great content.
- If you have downloaded the video to your computer, and have access to video editing software, you can even edit smaller bits out of this video to re-create a shorter version or a snippet for your Instagram feed or stories, or even a small video ad!
- Embed your FB Live into a blog post – use the topic that you talked about or showcased during the Live, to create an entire blog post, adding your video as an extra bonus to give your blog readers a visual of exactly what you are trying to teach them.
Here’s an example of a Facebook Live I did for Essential Stencil, below. I downloaded the Facebook live video file via my FB page video library (in Facebook’s Creator Studio), then uploaded it to my Youtube channel, and now here it is, embedded into this blog post:
I hope this post has answered a lot of Facebook Live questions for you, or at least inspired you to improve your Facebook Live skills and make the most of your online presence for the benefit of your DIY or Painting business.
Please, if you have any questions, please post in the comments below, and if there are any social media or video related topics that you would find helpful, let me know and I may address them in future posts.
Want more tips for your Social Media and DIY/Painting business? I have started a FREE newsletter, where I’ll be sending occasional content, ideas and more to help you grow your creative online business. Join me here:
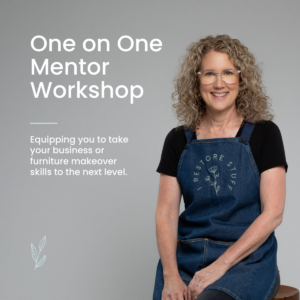
Need Help with your Creative Business?
Why not book in for a one-on-one workshop or “pick my brain” session where we can talk about your business needs. I’d love to help you with any of the topics I cover in the description of my one-on-one WORKSHOP link. [click the image below for more info]
Have you tried Tailwind – the awesome app for Pinterest that allows you to schedule pins on a regular basis? Check it out here:
