
Updating our bedroom suite was a goal I was determined to achieve when we first started building our new home a year and a half ago.
We had downsized from our home of 18 years and this was to be the very first time we had built new. Between selling and the time the new house was due to be finished, we rented for 18 months and so continued the process of eliminating clutter and things collected over the 18 years in a much larger house.
TIME FOR A CHANGE
Along with that comes decisions on what furniture to get rid of and what to purchase new.
We knew we had a couple of big items that we had to purchase – our old sofa couches that had seen us through 18 years of family fun with four kids through their growing up years on to adulthood – yeah, those were NOT coming with us to the new house.
So those were definitely in the “get rid of them” pile.


However, our Queen size bedroom suite still had good bones.
But as you’ll see in this picture, it has also had its fair share of rough treatment by our beloved cat, Missy who grew up learning how to balance on the ends of the bed. Yes, often on the bed head where she did fall off onto my head a time or two!
I know, you’re probably wondering if and how I removed all of those scratches … stay tuned.
Before – 20 year old Queen size Bedroom Suite
I forgot to take an overall photo of the entire suite before the refurb, but I did post this short video on my instagram stories, so will include it here to show you my lofty goal of getting this set all refinished about a month or so before our new house was ready to move into.

So … how does one work towards a mammoth goal like refinishing an entire queen size bedroom suite without a huge workshop space to do it in? I suppose it’s a bit like trying to eat an elephant – one bite at a time, haha.
So here’s the first “bite” – one bedside table with 3 drawers.
I wanted to turn this set from it’s orangey red wood, into some kind of French Country Farmhouse suite, with a natural wood finish on top and either black/navy or white on the base of all of these pieces. When we took a family vote, white won over black or navy, and I’m glad the other family members overruled my lazy thinking. You see, I knew if I painted the base black or Midnight Blue, it would take way less coats, and therefore I would get the job done so much faster. But now that they’re finished, it was truly worth the extra time taken to do those additional coats of white to get a full coverage.
How does one work towards a mammoth goal like refinishing an entire queen size bedroom suite without a huge workshop space? …one bite at a time.
Stripping the tops

I used Citri Strip to remove the varnish from the surface. If you’re unsure what the surface of your piece is finished with, you can find helpful info in my Wood Finishing Series on how to test your surface to discover what is sealing the piece.

I use this method of adding plastic wrap (just ordinary kitchen food wrap like Glad Wrap) over the top of the stripper once you’ve applied an even coat to the surface. I have another post about this here: Stripping an Old Door. I find that it keeps the stripper from drying out too quickly and allows it to penetrate the varnish to soften it more effectively.
After removing the plastic wrap and using a scraper to scrape away as much of the old varnish as I could, I had the option of doing a second coat of the Citri Strip OR going straight to sanding the top. For some of the other pieces in this bedroom suite, I opted to do an additional coat of stripper, but for this one, I went straight to the sander and chose a rough grit to start with. It really does depend on a few factors as to how much the stripper will remove – for eg. how many coats of varnish were applied on the original piece; how long you leave the stripper on; how heavy handed you are at using the scraper, etc. Some pieces in the past have scraped off in one easy coat.


Here is the top of the long dresser/mirror piece as I didn’t have a pic of sanding process of the bedsides, but same idea. I used a fairly rough grit like 80 to get that first lot of stain off. You’ll find that even though the varnish is removed, there can be stain that goes down into the wood grain, and if I don’t sand back past the stain, the finish will end up very patchy.
The Ugly First Coat Stage
If you’re new to painting furniture, don’t be freaked out by the first coat stage – yes, it will look something like this (below). But after the 2nd and 3rd coats (if painting a dark wood white you’ll need at least three coats, other colours may only need two), you’ll see the transformation coming together nicely. See the top has been sanded down to raw pine – I went to a finer grit after the 120-80 grit at the start, changed to a 240 grit, then finished off with a 400 grit to give a smooth surface on top ready for refinishing. For this project, I used Fusion’s off white, Victorian Lace. If you’re looking for Fusion Mineral Paint products in North America, you can use my affiliate link here.
Need a tip on the basics of laying paint down neatly on your furniture without getting drips or ridges? Here’s a quick Facebook video to show you how.


Do you remove the drawers before painting your pieces? Some painters don’t, but I prefer to. I feel like I have more control over the paint that might go in between the drawers, and it just seems a lot easier to get a neater finish on all of the surfaces you need to paint. I think I ended up doing about four coats, just to be sure it was fully covered with no shading at all peaking through from that dark wood.
Adding White Wax for a White Wash Look

I wanted a white wash look for the top surfaces and there are a number of ways to do this. I chose to use a white wax, which is easy to apply using a wax brush. Then remove excess with a lint free cloth or applicator, and buff to a sheen with a clean lint free cloth (preferably a white one – eg. an old white t-shirt).
See the difference below with the white wax on the left and the raw timber on the right.
I continued the above process to each of the pieces: the dresser, the bed ends and both besides – stripping the tops, painting the sides, drawers, slats, etc.
Painstakingly, one piece of furniture at a time lined up in my garage or out in the backyard for sanding.


Even the bed rails … see these before and during pics:


MIRROR TIP
If you’re painting a dresser mirror, check the back to see if the backing is screwed in place and can easily be removed. Mine was, so I was able to remove the entire mirror from the frame which made it so much easier to paint the frame rather than masking the entire mirror surrounds.

THE CAT SCRATCHES
Oh, and if you’re wondering how I removed ALL the cat scratches from the bed ends that I mentioned earlier – it was tricky, but the tip is very basic – just keep sanding. That’s it. Keep sanding and keep sanding until all those little pesky scratches are a thing of the past!
Ready for the Final Results?
I found these adorable simple gold knobs to replace all the hardware, and the enormous task was completed in time for our move to the new house!

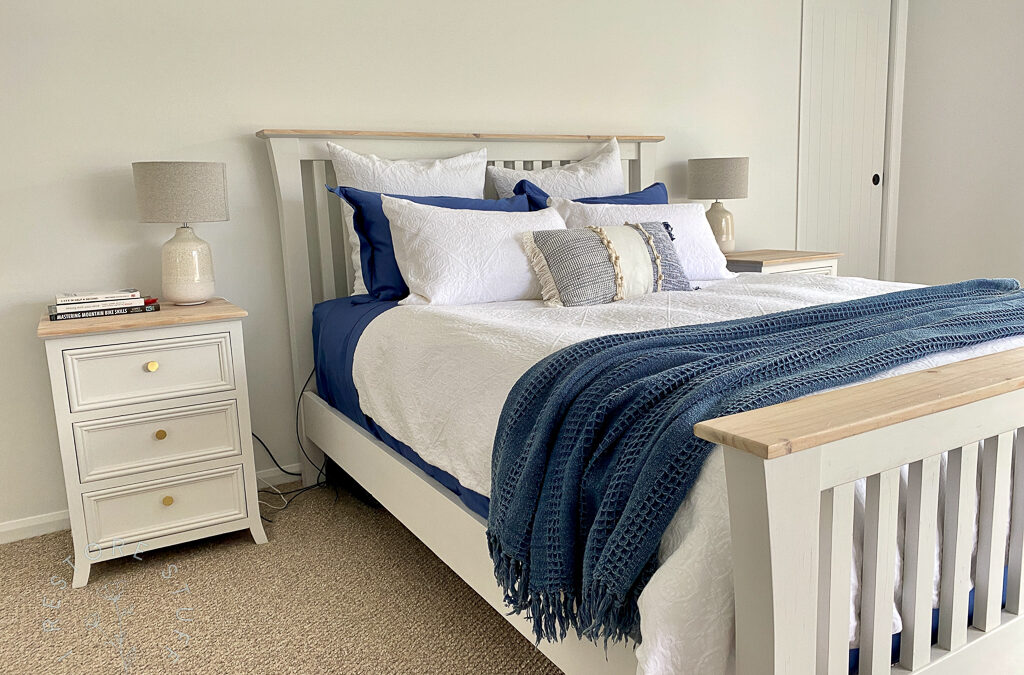
Of course this also called for a new quilt cover set, and later, new linen, but here’s the final look of the whole suite in our new master bedroom. Such a difference from the dark reddish orange (and highly scratched) timber.


I knew the whole room was looking very neutral, so I went shopping for some new linen and found a navy throw rug at Early Settler and this small textured pillow from Pillow Talk (Australia).

CERTIFIED ORGANIC SHEETS

I’ve been wanting to try some certified organic sheets, and these ones that were on sale at Blessed Earth (use my code IRESTORESTUFF for 5% off) are such beautiful quality – I don’t think I’ve ever bought such excellent quality linen before! As their site says: “The Magnificent range is made from a 700 thread count organic cotton, with a sateen finish. Our most luxurious range is wonderfully soft and offers a slightly heavier weight cotton and excellent durability.”
USE CODE “IRESTORESTUFF” FOR 5% OFF

I love the navy border stitching feature around the pillow cases and at the top of the flat sheet. Such careful attention to detail.
If you’re after a quality set, the wonderful team at Blessed Earth are offering my readers 5% off if you use my coupon code: IRESTORESTUFF at checkout.
They have some lovely colours in their “Magnificent” range.

Now to find some beautiful artwork for the wall above the bed. We have a big space also in the corner where I am standing to take this last picture. I’m imagining a cosy corner reading chair with a little side table or small book shelf.

If you’ve enjoyed reading about this makeover, you may like some of my other furniture makeovers or visit my “Learn to Paint” tab to find more DIY tips for painting your own pieces.
Below is a 4 minute video that includes a little more of the process of this makeover if you’re looking for more of a visual demo. Combined with the blog post above, I’m sure you’ll find it a helpful addition and inspiration for your own room makeovers. If you have any further painting questions, feel free to leave a comment at the end of this post, or reach out to me for a more in depth consultation by booking a one-on-one session to learn more about painting your own furniture.

What a transformation. It looks amazing, Sharon
Enjoy your new home. 😊
Thanks so much, Alice. Lovely to hear from you. We’re enjoying our new place.
Absolutely beautiful transformation Sharon. You’ve created a brand new bedroom that’s so fresh and inviting. Lovely job.
Thanks so much, Cathy. It feels so much fresher and new.
Thank you Sharon for the comprehensive description of your methods. As a beginner, I really appreciate the hints and detail. That’s the way I teach too. Greatly appreciated.
Sharon – I just watched your clip – Wow what a big job ….. your bedroom suite looks fantastic, well done.
Thanks for sharing, I have a bedroom suite stored in our barn at the farm ….. maybe I need to get it out and start sanding. Enjoy.
Thanks so much, Deb. Good to hear from you. Yes, get that sander out. So much potential with these dated pieces.