
From Golden Pine Chipped Varnish, to Modern Wash & Paint Combo
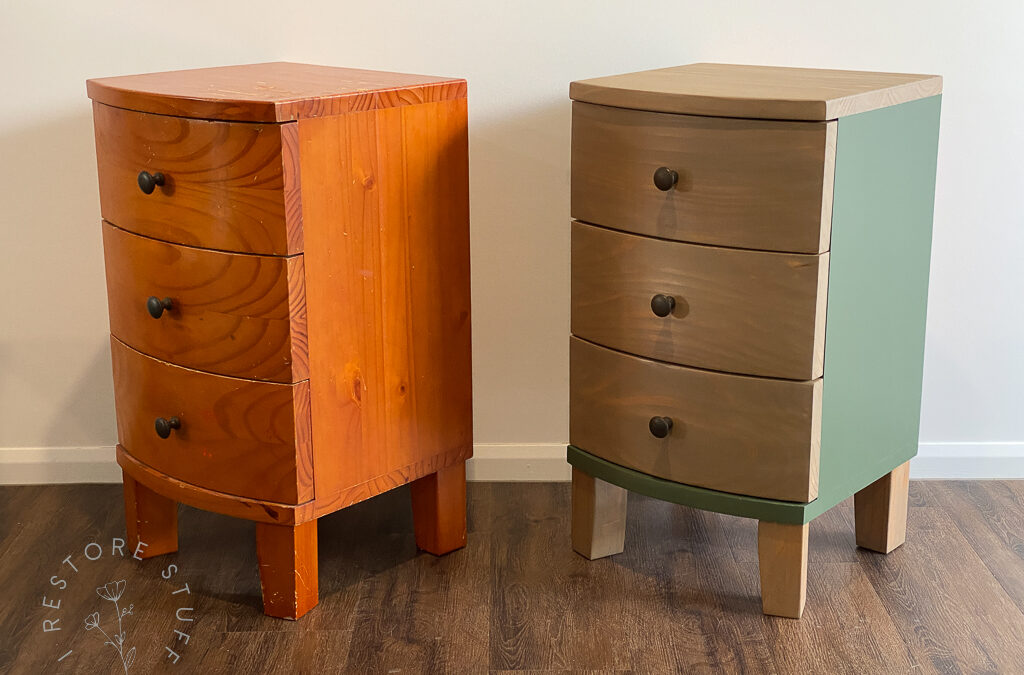
Cotswold Green Bedside drawer beginnings … These bedside tables had served a great purpose for many years, when I received them from a friend who was getting rid of furniture recently. I would usually start these together as a pair, stripping, sanding, and painting them both, side by side. This time I decided to make over one to start with, so that I could have a side by side before and after example to show the difference you too can make, on some old furniture you may have lying around at home.
But, to be honest, I’m not sure how long they’ll stay as “examples” because if I have a piece of old furniture that needs refinishing in my garage, there’s no holding me back for too long, because every time I walk past it, I can hear it calling me … “Come back, … I wanna look new and pretty too!”
Here is what I started with …


First Step – Stripping the Varnish
When dealing with old varnished wood that has chipped this badly over time, even if you are planning to paint the top, it is best to remove the old varnish or lacquer completely. To not do so, will result in a very uneven finish, and those rough patches will definitely show through your paint work.


I usually use a citrus type stripper such as Citristrip or similar, and you can see one of my favourite methods of stripping here in this popular blog post where I stripped an old door.
I took all the drawers out and stripped each drawer, as well as the tops of each bedside. These were the sections that I initially envisioned to use a stain on those areas, showing a nice woodgrain result. After I’d stripped these, I eventually decided to also strip and sand back the feet/legs of each bedside.
As you may have seen in the blog post I referred to above, I add plastic wrap to cover the stripper and let it sit for the required time (via product instruction label). Then I use a scraper to remove the excess varnish and stripper. You can see it doesn’t usually remove all of the varnish, but it certainly removes the majority of it, leaving you with so much less to sand off.
Some people prefer to just sand it and not mess with stripper, and I have done that for many pieces too. But some, like this one, you just know that the thickness of the more modern varnishes or lacquers are going to require extra grit to remove.


Sanding back to raw for staining
I received this Makita sander for my birthday this year, not that my Ryobi one wasn’t cutting it, just that I needed one that I could attach a shop vac hose to, in order to limit the dust flying around the garage in our new house. Since downsizing, that’s one thing I miss is the big back yard to sand in.
Once sanded back, you should see no remaining golden tinge of any old varnish on the surface. Here you can see the drawer in the middle hasn’t been sanded, and the other two are finished sanding, showing the beautiful wood grain underneath. When sanding, I usually start with a medium grit like a 180-240, then finish off with a 320-400 grit sanding pad. The finer you go, the more smooth your surface will be ready for it’s stain or finish.


Now all the parts of the piece that I want to stain are sanded back ready for their new finish. The remaining sides and base of the piece will be painted, so it isn’t necessary to remove all the varnish. Unless of course, the sides had chipped really badly like the top, which they hadn’t. All I had to do to prep the sides, was clean and scuff sand ready for painting.
I did change my mind later about those feet/legs though. Ended up just sanding that varnish right off and skipping the stripper step.
Creating a Stain from Chalk Paint
I love to create stains or washes using our water based paints, and Artisan Chalk Finish is a great option to use for this. It is so easy to create a stain or wash by simply watering down the paint colour of your choice.
For this, I wanted a light, almost driftwood wash, so I started with the Artisan Chalk Finish colour, Mocha. I used roughly one part paint to about 8-10 parts water. In reality, my estimates are so rough, that I literally had a small dish of water, dipped my paint brush in the paint and then stirred it into the water in the dish (I have a video in this post I’ll include). But you can test out your ratio on a piece of scrap wood or on a section of the piece you are working on that will be less conspicuous. Sometimes if I think the stain needs to be a little thicker, I’ll do more of a 50:50 ratio, but for this one, I’m guessing it was around 1:8.

Keep in mind that chalk paint dries quite porous, and requires a finish or sealer over the top.

Sealing your stain or wash
Here’s how the drawer fronts look before (middle) and after using the Mocha stain wash. Keep in mind that chalk paint dries quite porous, and requires a finish or sealer over the top, so when you see the stain wet, that’s how it will likely look after you seal it. When you view the stain in it’s dry state, it will appear much lighter than it will once it is sealed.
I added two thin coats of Artisan Gloss Sealer on all the stained sections using Artisan’s Super Sponge applicator for a nice smooth finished result. You’ll see the application of this in the video in this post.
Artisan Mineral Paint Cotswold Green
At the time of this posting, Cotswold Green is Artisan’s newest Mineral Paint colour in the range. What a lovely deep olive colour it is and proving very popular as an added pop of natures tones on the inside of homes and office spaces.
I painted the sides and base of this bedside set, and I love the contrast it has with the stain on the drawers.


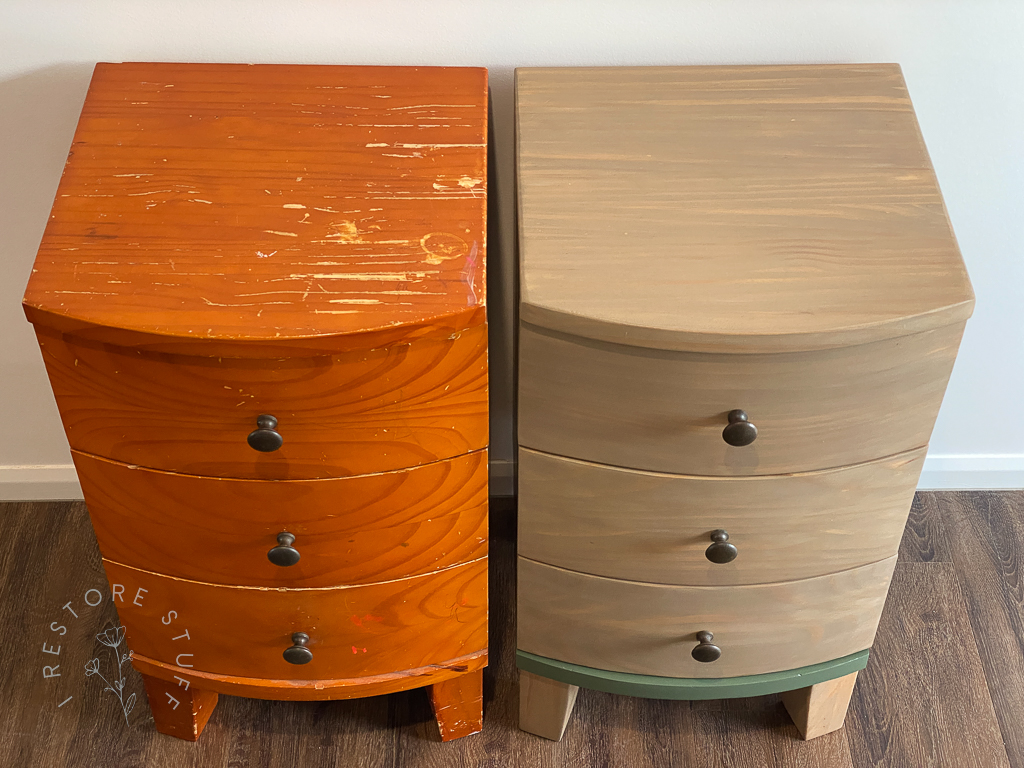
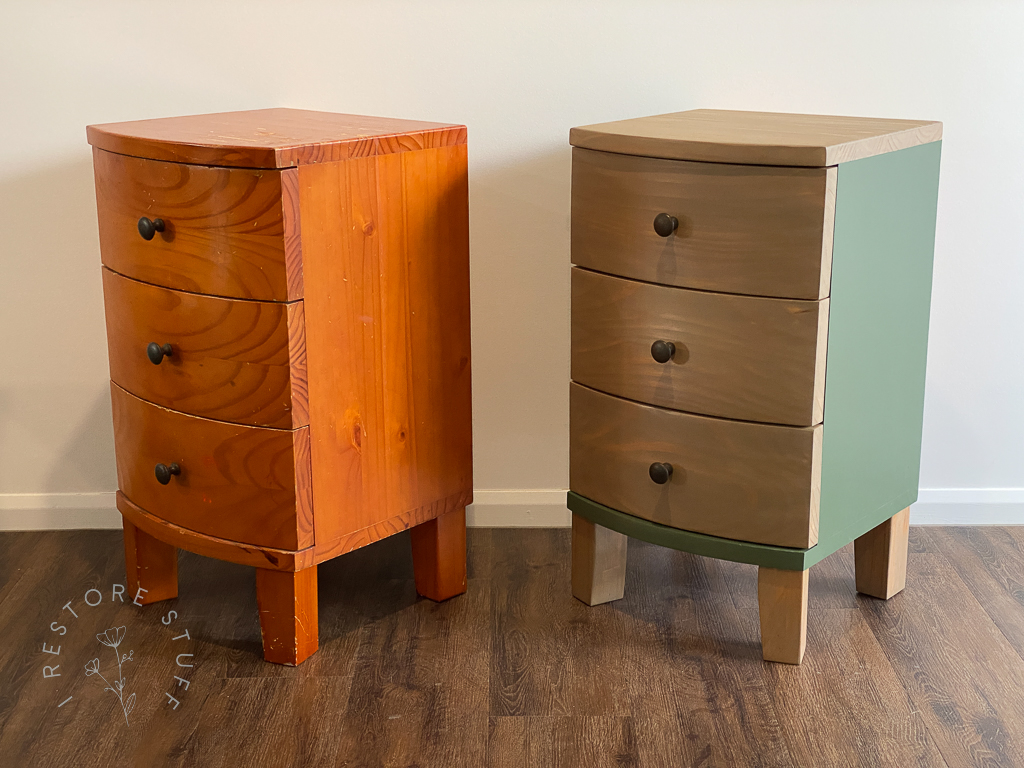
Swipe or scroll through the above gallery images to see the amazing comparison between the before and after of these pair of bedside drawers. I love the contrast, and I hope it has inspired you to think of options for your old furniture. If you’d like a full list of products used in this furniture makeover, I’ve made a convenient list for you below.
*Note, Artisan Paint products are available in Australia via my website at these links, or in store at my shop at Camp Hill Antique Centre here in Brisbane.
(Some of these items may be affiliate links, which means you would be supporting my blog by clicking on the link to purchase them, at no additional cost to yourself)
Supply List for this tutorial:
- Paint Stripper
- Paint scraper tool (in the video I show also how I sometimes use a Carbide Scraper tool. This has been a game changer)
- Sander – I used a Makita Random Orbital Sander, but you can use any electric sander that you find to suit your needs.
- Artisan Chalk Finish – Mocha
- Artisan Gloss Sealer
- Artisan Super Sponge Applicator (for applying sealer)
- Artisan Mineral Paint – Cotswold Green
")